#json data creator local machine
Explore tagged Tumblr posts
Visit Tumblr Blog
Explore Tumblr blogs with no restrictions, modern design and the best experience.
Last Seen Tumblr Blogs


Fun Fact
12.7% of mobile users access Tumblr.
Text


#lottieanimation#lottie#json online formatter#motion graphics#animation#visual json python#json data creator local machine#php json decode depth#xamarin appicon json#webdevelopment#behance
1 note
·
View note
Text
SAS Viya Tools
SAS Drive is the web-based hub (that is, the single point of access) for SAS Viya solutions.
Model Studio, a web-based visual interface.
The main container for your analytic work is a project. A basic Model Studio project contains a data source, a pipeline that you create, and related project metadata. Remember that a pipeline is a structured workflow of analytic actions that is represented as a diagram. In the pipeline diagram, a node represents each action. Some examples of project metadata are the project type, project creator, creation date, and last update. A project can also have multiple pipelines and pipeline comparison results.
Data Sources and CAS With SAS Viya, you can access a variety of data sources, such as relational and unstructured data, Hadoop, and various file formats (for example, XML, JSON, CSV). These data sources can be located in local or external databases as well as in the cloud. Persisted in-memory data is a unique SAS Viya feature. This is the shift away from using flat files and external data sets to a strategy of using persisted, pre-loaded data tables. In SAS Viya, all data typically go through an I/O conversion process only once and can be reused as many times as needed thereafter, without incurring the same expense of conversion into a binary, machine-level format. SAS Viya data are either stored within the RAM of a single machine (and run in SMP mode) or within a shared pool of allocated memory created from several networked machines as part of a common memory grid (which enables Massively Parallel Processing, or MPP mode). That pooled memory array is an integral part of CAS. After the data are loaded into CAS, all processing instructions execute very quickly against the pre-converted, in-memory data.
Caslibs All data is available to the CAS server through caslibs, and all operations in the CAS server that use data are performed using caslibs. A caslib provides access to files in a data source, such as a database or a file system directory, and to in-memory tables. Access controls are associated with caslibs to manage access to data. You can think of a caslib as a container with two areas where data is referenced: a physical space that includes the source data or files, and an in-memory space that makes the data available for CAS action processing. Authorized users can add or manage caslibs with the CASLIB statement. Caslib authorization is set by your administrator. In some instances, such as when you copy native CAS tables that are not in-memory, a caslib is required although data are not copied to the caslib.
Loading Data to a Caslib You can load a SAS data set, database tables, and more to a caslib. The DATA step, the CASUTIL procedure, and CAS actions can be used to load data into CAS. After the data is in a caslib, you can use a DATA step, procedures, CAS actions, PROC DS2, or PROC FEDSQL operations on the CAS table. Tables are not automatically saved when they are loaded to a caslib. You can use PROC CASUTIL to save tables. Native CAS tables have the file extension .sashdat.
The CASUTIL procedure works with tables in SAS Cloud Analytic Services, SAS data sets in SAS libraries, and external files. The procedure has three functional areas:
data transfer
table and file information
drops tables and deletes files
In the area of data transfer, you can perform the following operations:
load a data set from a SAS library into a memory on SAS Cloud Analytic Services.
save in-memory tables in a caslib to the data source that is associated with the caslib.
load files from the data source that is associated with a caslib into memory on SAS Cloud Analytic Services.
0 notes
Text
Recreating the CodePen Gutenberg Embed Block for Sanity.io
Chris recently put out a neat CodePen Embed Block for the Gutenberg editor in WordPress. It allows you to embed a Pen just by dropping in its URL. From there, you get access to control the size, theme, and the default tabs that render on initial load. Super neat!
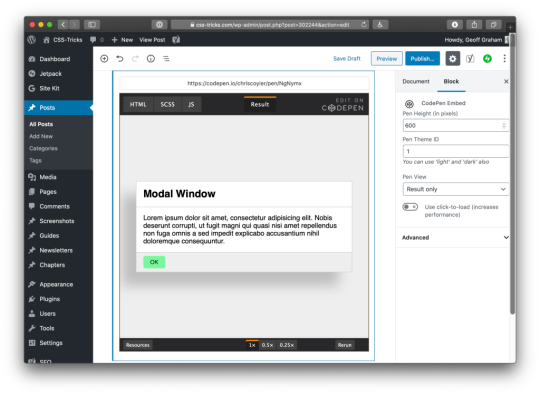
Having a live preview of the embedded Pen while writing is so handy!
But it got me thinking: How difficult would it be to recreate it with Sanity Studio’s Portable Text editor? (Spoiler: Not that difficult). Since I already knew how to do it, it took me under seven minutes from start to finish. This tutorial takes you through how to get up and running with a studio, and how to add the schemas and the custom preview component for a CodePen embed.
So this is me recreating @chriscoyier’s CodePen Gutenberg Block for @sanity_io’s rich text editor in less than 7min (3x video). Best thing is, you actually just store the structured data, making it queryable, future proof, and easy to integrate with whatever frontend you prefer. https://t.co/psPn6NtPjz pic.twitter.com/6aSGKerHfO
— knut (in SF 🇺🇸) (@kmelve) January 18, 2020
That felt so cool that I want to teach you how to do it as well. Let's dive right into it.
Getting Sanity Studio up and running locally
First, you'll need to install Sanity Studio locally on your machine. In this tutorial we will be using the blog studio that you can initiate from the command line, but you can also check out the different starters on sanity.io/create. You should be able to tag along with one of those too.
This tutorial assumes that you have a bit of knowledge of JavaScript. It will use a bit of React, but only a small part. You should have installed node and npm if you haven't already.
Oh, and you'll want the Sanity CLI, which you can snag with the command line:
npm install --global @sanity/cli
Once the installation is done, you can initiate a new Sanity Studio with a new project by running the command sanity init. It will let you log in with your Google or GitHub account (or make a new account with an email/password). Give your project a name and follow the instructions. When given the options for a project template, choose the blog one:
? Select project template Movie project (schema + sample data) E-commerce (schema + sample data) ❯ Blog (schema) Clean project with no predefined schemas
After completing the steps, change directory (cd) into the new project folder and open it in your favorite code editor. To start the developer server that will also hot reload your studio when you make changes, run sanity start. To stop this server, you press ctrl + C in most command line tools.
Adding the schemas for a CodePen embed
Schemas define which document types that are available in the Studio, and which input fields they have. These schemas are defined in JavaScript objects that you import into the schemas.js file, where they are exported as a function that the Studio translates into its UI. There's a lot you can do with these schemas, but in this tutorial, we will keep it reasonably simple.
Start with adding a new file inside /yourproject/schemas called codepen.js. Then type in this code:
export default { name: "codepen", type: "object", title: "CodePen Embed", fields: [ { name: "url", type: "url", title: "CodePen URL" } ] };
Then you can go to /yourproject/schemas/schema.js and add the following two lines of code to it:
import createSchema from "part:@sanity/base/schema-creator"; import schemaTypes from "all:part:@sanity/base/schema-type"; import blockContent from "./blockContent"; import category from "./category"; import post from "./post"; import author from "./author"; import codepen from "/codepen.js"; //
So what did we just do? Well, we have now made this CodePen object available as a type in other schemas in the Studio. In other words, you can now add type: 'codepen' to get those fields anywhere else in the schema code where you add fields. Adding this type to the rich text field is also our next step. Hang on!
Adding the CodePen field to the rich text editor
Before diving into the code bit, let us take a step back and look at what is going on in terms of the data formats we operate with, and how WordPress and Sanity differ slightly.
While Gutenberg stores rich text as JSON in its runtime (which is great!), what developers end up dealing with is mostly this content as HTML and JSON objects inside of HTML comments.
Sanity stores and distributes rich text content as Portable Text, which developers then serializes in their frontends. That means that you get fine-grained control over how rich text content is rendered by letting you use custom components for your favorite framework, either it's React, Vue, Svelte, or .NET, PHP, or even Markdown.
In other words, you store your content as structured data in Sanity’s backend, and then decide how you want to use the data inside your frontend components. But enough exposition, let's get back to the code!
Open /schemas/blockContent.js and notice that it's of the type array. Yes, rich text is an array of different types, where one of them has to be of the block type (in which text paragraphs are stored). So the simplest way of making rich text is the following schema definition:
export default { name: "body", type: "array", title: "Body", of: [ { type: "block" } ] };
Now, blockContent.js has a bunch of more stuff. You can see styles, lists, marks, and so on. All defining which properties should be available for the author. In the top array, there are two types block and image. We are going to add the third one, codepen:
export default { title: "Block Content", name: "blockContent", type: "array", of: [ { type: "block" // ... }, { type: "image", options: { hotspot: true } }, { type: "codepen" } ] };
Save the file, and that's it! If you now run sanity start in your command line (assuming you haven't already), and open the Studio on https://localhost:3333, you should be able to find your new field in the rich text editor under the "post" type:
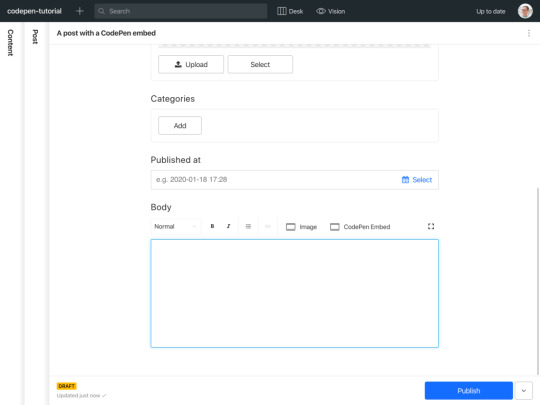
If you try out the new button, you'll get a modal with the URL field that you defined in the previous section. Feel free to add the URL from a cool CodePen that you have found. We will use this one from the legendary Sara Drasner; it's pretty cool.
CodePen Embed Fallback
Just showing the URL value in the editor isn't especially inspiring, though. So let's go ahead and add the actual CodePen embed so we can interact with it directly in the editor!
Adding the CodePen embed as a preview
Open /yourproject/schemas/codepen.js again. Now we are going to make a small React component for our preview. Start by importing React in the top, and the boilerplate for the React component that we will turn into the embed:
import React from "react"; const CodePenPreview = ({ value }) => { return <pre>{JSON.stringify(value, null, 2)}</pre>; }; export default { name: "codepen", type: "object", title: "CodePen Embed", fields: [ { name: "url", type: "url", title: "CodePen URL" } ] };
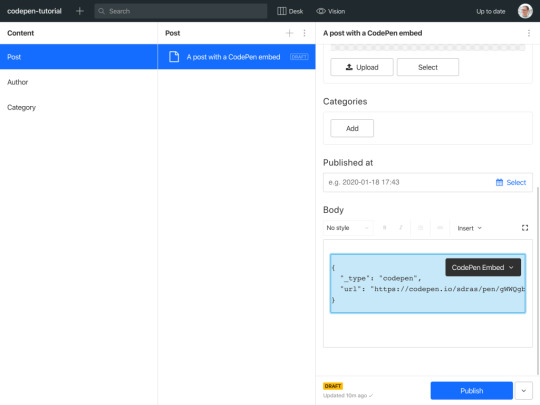
The JSON.stringify stuff is a temporary little way of outputting the incoming data in a readable manner. You could also use console.log(value), but who has time to open the developer console?
Now you must tell Sanity how to use this component for the preview. As well as which of the fields in the object it should select for the value in the preview component.
import React from "react"; const CodePenPreview = ({ value }) => { return <pre>{JSON.stringify(value, null, 2)}</pre>; }; export default { name: "codepen", type: "object", title: "CodePen Embed", preview: { select: { url: "url" }, component: CodePenPreview }, fields: [ { name: "url", type: "url", title: "CodePen URL" } ] };
The editor should look something like this after you saved your changes:
Cool! Now we want to take the url value and somehow integrate it with a CodePen embed. The easiest way to go about this is to fit the markup for CodePen’s iFrame embed, and fit into our preview component in React.
The original iFrame element will look like this:
<iframe height="265" style="width: 100%;" scrolling="no" title="React Animated Page Transitions" src="https://codepen.io/sdras/embed/gWWQgb?height=265&theme-id=dark&default-tab=js,result" frameborder="no" allowtransparency="true" allowfullscreen="true"> See the Pen <a href='https://codepen.io/sdras/pen/gWWQgb'>React Animated Page Transitions</a> by Sarah Drasner (<a href='https://codepen.io/sdras'>@sdras</a>) on <a href='https://codepen.io'>CodePen</a>. </iframe>
If we paste this snippet into our preview component, it will almost work. In order to make it JSX-compatible you'll have to some few changes to some of the HTML-attributes. Make sure that you change:
style="width: 100%;" to style=
frameborder="no" to frameBorder="no"
allow-transparency="true" to allowTransparency
allow-fullscreen="true" to allowFullScreen
You can remove the content (links, etc.) inside of the iframe, because it isn't particularly useful inside the studio. What we should end up with is something like this:
import React from "react"; import Codepen from "react-codepen-embed"; const CodePenPreview = ({ value }) => { return ( <iframe height="265" style= scrolling="no" title="React Animated Page Transitions" src="https://codepen.io/sdras/embed/gWWQgb?height=370&theme-id=dark&default-tab=js,result" frameBorder="no" allowTransparency allowFullScreen />); }; // ...
When saved, we should be able to see the CodePen embed inside the rich text editor:
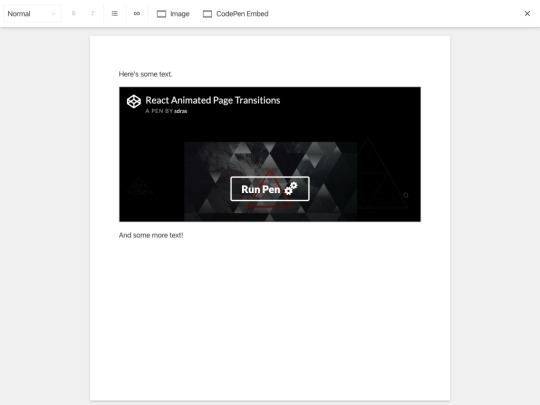
Notice that the iFrame has an embed URL with some parameters for how it should be displayed. Of course, we could've asked someone to dive into CodePen to obtain this URL, but it's probably better for to use the regular one. We'll take the effort to reassemble into what we need:
The last part is to take the URL from the field, and get the hash and user out of it.
We split the URL string on forward slashes into an array. Then we use array destructuring to assign the different array elements to a variable. Since we only need the user and the hash we leave the other positions empty. This method isn't bulletproof, as it assumed a specific format for the URL, but it works for this example. Then we reassemble the embedUrl by using template literals.
import React from "react"; const CodePenPreview = ({ value }) => { const { url } = value; const splitURL = url.split("/"); // [ 'https:', '', 'codepen.io', 'sdras', 'pen', 'gWWQgb' ] const [, , , user, , hash] = splitURL; const embedUrl = `https://codepen.io/${user}/embed/${hash}?height=370&theme-id=dark&default-tab=result`; return ( <iframe height="370" style= scrolling="no" title="CodePen Embed" src={embedUrl} frameBorder="no" allowTransparency allowFullScreen /> ); }; // ...
Save the changes and voilá; we're pretty much done with the custom CodePen block!
Taking it further
Now, you probably noticed that Chris had put more settings into his custom block. Nothing is stopping us from doing the same! If we look up the documentation for the React CodePen embed component that we installed, we'll find a table of properties that it can take. We can add these as fields in the schema definition. For example, if we wanted to add the themeId, we could do it as follows:
import React from "react"; import Codepen from "react-codepen-embed"; const CodePenPreview = ({ value }) => { const { url, themeId = "dark" } = value; // <= add themeId here, default it to "dark" const splitURL = url.split("/"); // [ 'https:', '', 'codepen.io', 'sdras', 'pen', 'gWWQgb' ] const [, , , user, , hash] = splitURL; const embedUrl = `https://codepen.io/${user}/embed/${hash}?height=370&theme-id=${themeId}&default-tab=result`; // <= add themeId here return ( <iframe height="370" style= scrolling="no" title="CodePen Embed" src={embedUrl} frameBorder="no" allowTransparency allowFullScreen /> ); }; export default { name: "codepen", type: "object", title: "CodePen Embed", preview: { select: { url: "url", themeId: "themeId" // <= add themeId here }, component: CodePenPreview }, fields: [ { name: "url", type: "url", title: "CodePen URL" }, // Add the new field below { name: "themeId", type: "string", title: "Theme ID", description: 'You can use "light" and "dark" also.' } ] };
Conclusion
We just looked at how schemas for Sanity Studio work, and learned how to make previews for custom components to boot! Hopefully, you now know enough to make pretty much any custom component with a preview using these same principles. If you do, I would love to know about it either on Twitter or in the comments.
The post Recreating the CodePen Gutenberg Embed Block for Sanity.io appeared first on CSS-Tricks.
Recreating the CodePen Gutenberg Embed Block for Sanity.io published first on https://deskbysnafu.tumblr.com/
0 notes